Cooking + Baking

You are currently browsing the archive for the Cooking + Baking category.

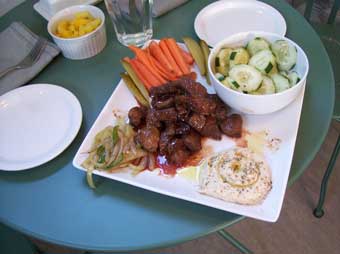
How’s that for a bit of illiteration?  Even better is the crispy kale itself.  Sorry, the above picture does not actually contain any, but I thought I’d at least try to make your mouth water a little.  That was dinner on Saturday, Mediterranean style – beef with a sherry reduction, sauteed onion and jalapeno, hummus made with butter beans because we were out of garbanzos (try it – yum!), and assorted crunchiness including pickles that I made last summer.  Gosh they’re good.

Anyway, to the crispy kale.  I saw this recipe while I was rowing in the basement.  Jacques Pepin made some on his More Fast Food My Way.  I was very intrigued and luckily had some kale in the fridge.

1 small bunch kale, ribs removed, and torn into 2″ pieces

olive oil

salt

Preheat your oven to 250.  Toss the kale in enough olive oil to lightly coat it, then sprinkle with salt.  Place a rack on a baking sheet and evenly distribute the kale.  Do your best to make sure the pieces don’t overlap because where they do, it won’t be as crispy.  We want crispy!

Place the pan in the oven and bake for 25 minutes.  The kale will shrink up and get very dark.  Remove from the oven.  Your choice here – start snacking or wait until cool.  We went to town the moment we took them out.  Lighter than a chip, crispy, and crazy good!  Unless you have multiple racks and baking sheets to make more than one batch, the bummer part is that it is devoured within minutes.  Enjoy!

Okay, as someone who writes for a “living,” I feel like a total dork, but did you know that bimonthy can mean twice monthly OR every other month?  What?!  I’ve only used it to express twice monthly, but now, I will be extra careful to avoid any sort of confusion because there is a mighty big difference between twenty-four and six.  Oy.  I am just reeling.  As someone with a deep appreciation for language and words, to say that I am disappointed to learn this is an understatement.  What kind of nutter butter decided this?

Anyway, You’re probably wondering why this even matters.  Well, I was starting to write a post about how I gather my friends up every other month for Bunco, but thought, surely there’s a word for that and did a little internet search.  There you go.  I’ve done the disappointing leg work for all of us.

As I was saying, I gather the lovely ladies to my house bimonthly, and we chat, roll the dice (most of the time), drink, eat, and are generally quite merry, often whooping and hollering with delight at our luck or lack of it.  We are a wonderful group of beautiful, smart, funny, caring, and talented ladies.  We love life, children (though I am the only one without any – they don’t hold it against me :), a good time, and a slice of cake.

About the cake, my dear friend Carolyn requested that I share the recipe from last Friday’s gathering.  It is quite rich, a little slice going a long way, and delicious, too.  I’m sorry I don’t have a picture of it, but we gobbled it up before I had the chance.  Also, I have no photos of the lovely ladies themselves, well, save one, but I didn’t think Mara and Amber would want to be singled out like that, so, instead, I’ve got one of the table I set for the festivities.  The tablecloth is the one I got from my adventure at The Bins, and the miniature daffodils are from our yard.  I’ll get a picture of all of the ladies next time.  I’m sure Greg won’t mind coming down in between whoops and hollers to capture our collective beauty for the ages and the blogosphere.

Anyway, the recipe is adapted from my very favorite dessert cookbook by the late Richard Sax, Classic Home Desserts:

Fabulous Flourless Chocolate Cake

Cake:

8 ounces bittersweet or semisweet chocolate, coarsely chopped

1 stick butter, cut into pieces, softened

6 large eggs: 2 whole, 4 divided

3/4 cup sugar

For flavor, pick one or two of the following:

2 tablespoons brandy or Grand Marnier

1 t cinnamon

Grated zest of one orange

Whipped Cream Topping:

1 1/2 cups heavy cream, well chilled

3 tablespoons powdered sugar

1 teaspoon vanilla

1/2 teaspoon cinnamon (optional)

Cake:

Preheat the oven to 350.  Line the bottom of an 8″ or 9″ spring form pan with a round of wax paper.  Do not butter the pan.  Melt the chocolate in a double boiler or bowl set over hot water.  Remove from heat and whisk in the butter until melted; set aside.

Whisk the two whole eggs and the four egg yolks with 1/2 cup of the the sugar, just until blended.  Whisk in the warm chocolate mixture.  Whisk in your optional flavoring – cinnamon, brandy, Grand Marnier, or orange zest.  Carolyn, for Bunco, I used the cinnamon.

In another bowl, beat the four egg whites until foamy.  Slowly add the remaining 1/4 cup sugar and beat until the whites form soft mounds that hold their shape but are not stiff.  Stir about 1/4 of the beaten whites into the chocolate mixture to lighten it; gently fold in the remaining whites, being careful not to deflate them.  Pour the batter into the pan; smooth the top.

Bake until the top of the cake is puffed and cracked and the center is no longer wobbly; 35-45 minutes.  It will still look pretty moist, so do not overbake.

Cool the cake in the pan on a wire rack; the cake will look like a crater, complete with a sunken center and high sides.  It ain’t pretty!

Whipped Cream Topping:

At serving time, whip the cream with powdered sugar, vanilla, and cinnamon.  Fill the crater of the cake and serve.  Also, be careful not to eat the wax paper you used to line the pan.  It disguises itself rather well, but if you pay attention, it can be peeled away as you slice the cake.  Enjoy!

Though we never actually call it supper, the alliteration is rather nice.  Here are two recipes that are grin worthy and very delicious together, the sweetness and crunch of the bread a perfect match for the spicy soup:

Italian Sausage and White Bean Soup

1 cup white beans (navy, cannelini, or great northern), soaked overnight in 3 cups water

1/2 pound spicy Italian sausage, cooked and crumbled

1 medium onion, diced fine

2 cloves garlic, diced fine

1 red bell pepper, diced

1 teaspoon smoked paprika (don’t use regular – the flavor isn’t the same)

1 teaspoon dried sage

1/8  teaspoon red pepper flakes (optional)

1 piece dried kombu seaweed

4 cups chicken broth

1 teaspoon salt

Drain beans and set aside.  Heat a medium size soup pot (mine is a 4 quart), adding a teaspoon of oil or some of the fat rendered from cooking the sausage.  Add the onion and garlic and cook until translucent.  Add the remaining ingredients, except for the salt, and cook on very low heat for three hours or until beans are soft.  Remove the kombu, add salt, and serve.

No Knead Sage, Raisin, and Pine Nut Toaster Bread

3 cups flour (you might not use all of it)

1/3 cup sweetened condensed milk

2/3 cup milk

1/8 cup water

1 package yeast

1/4 teaspoon baking soda

1/2 teaspoon salt

1 tablespoon fresh chopped sage

1/4 cup raisins

1/4 cup pine nuts

I used the sweetened condensed milk because I had some left over from another recipe.  If you don’t happen to have any, no worries.  Use 1 cup milk and 1-2 tablespoons sugar.  Grease an 8×4 loaf pan, set aside.  In a large mixing bowl, mix 1 1/2 cups flour, yeast, and baking soda.  Place the milk, water, sugar (if using), and salt in a small saucepan and heat until warm, about 120 degrees.  Do not allow to boil.  Pour into the flour and mix until incorporated.  Add raisins, nuts, and sage, mix well.  Add remaining flour, 1/4 cup at a time until well incorporated.  You want the dough to be slightly sticky, so don’t add all the flour unless you need it.

Place in the loaf pan, cover loosely with a towel, and place somewhere warm for about 40 minutes.  It should be about double in size.  Twenty minutes before the dough is finished rising, turn the oven on to 400 and place an empty roasting pan on the lowest rack.  Once preheated, place the bread on the rack above the roasting pan.  Quickly add a cup of hot water to the roasting pan and close the door pronto!  We’re using the steam to make it extra hot and get a crispier crust.  Bake for 25 minutes, until golden brown.  Allow to cool for about five minutes before removing from pan.

This bread has the texture of an English muffin, so it really is better toasted, hence the name.  Before serving your soup, toast up a slice or two of the bread, and serve together.  We didn’t use any butter, but it would taste mighty fine with it.

This probably makes enough for six big bowls of soup paired with six thick slices of bread.  Happy eating.

Tags:

When we lived in Denver, there was a great breakfast place, since gone, like so much of our past, where we would enjoy these simple, but utterly delicious breakfast bowls.  We walked from our apartment on 11th to Cherry Creek and enjoyed every bite without guilt because we exercised too!  They had a more glamorous name, but I don’t remember it because we always called them the bowls.  I made them this past weekend and thought I’d share the recipe with you.  This makes two, but it is easily adapted.

Breakfast Bowls

2 English muffins, sliced and toasted

1 small can green chiles (you might not use all of them)

4 slices bacon, crumbled, or equivalent in breakfast sausage

grated monterey jack or cheddar cheese – to your liking

3 eggs, poached or or cooked to your liking – make sure they are a little under-done.

4 tablespoons heavy cream

salsa

Preheat your oven to 375.  Cut the toasted English muffin into cubes.  Also, if you can find Australian toaster biscuits, use them instead.  They’re great.  We haven’t seen them around here in a long time – like the restaurant where we first got these, they may be gone.  In an ovenproof bowl, layer the muffin, cheese, green chiles, and bacon or sausage, repeating several times.  Top with the egg (I use two for the G-Man).  Put a final sprinkling of cheese over the top.  Drizzle a couple of tablespoons of heavy cream over all.

Bake for about five minutes – until the cheese is a little bubbly.  This is why you want your egg underdone.  It will cook a bit more in the oven.  Remove from the oven, top with a little salsa, if you like, and eat carefully.  The bowl is hot to trot!

If you’ve toasted your muffin well, the texture will be slightly crusty and creamy.  So yummy!

Tags: ,

This here, my pretties, is truly happiness on a plate, well, at least, for me and my family.  Paris (Hello in heaven,sweet girl), as much as she may want a taste, will get no such thing.  It’s mine, bwa ha ha!  But, you, gentle reader, should you like to follow the recipe, can savor bite after bite.  I’m going to put on my teacher hat here and ask that you read the whole recipe before you start, because it is done in stages.  You’ll see.

Colleen’s Green Chile Burritos

2-4 pound pork shoulder roast, cut into 1″ chunks, removing as much fat as you can

28 oz diced green chiles (use more or less, to your taste). If you like it SPICY use some 505, jarred green chile.

2 fresh poblano peppers (optional)

2 dried ancho/pasilla chile (a dried poblano with different names – very dark and wrinkly)

2 dried New Mexican chile (dark red and slightly translucent)

1 large onion, diced

8 cloves garlic, diced or 1 T garlic granules

2 teaspoons salt (I use smoked sea salt fantastico!)

1 teaspoon mild New Mexico chile powder (optional)

1 teaspoon cumin

1 cup dried pinto beans

1 piece kombu seaweed (optional)

water

tortillas

grated cheddar or monterey jack cheese

other toppings of your choice – lettuce, sour cream, avocado, black olives

For the beans:  The night before you want your burritos, get the beans soaking.  I use the same pot I will cook them in.  Use enough water to allow the beans to triple in volume.  Once the chile is going, drain the soaking liquid from the beans, and add enough water to cover by about an inch.  Add the kombu – it is supposed to help with the dreaded after-effects of beans, and truth be told, I think it works.  Whenever I make beans without it, I’ll be honest – there is more farting.  I bought mine at New Seasons ages ago, but I’ll bet an internet search will reveal more sources; the package lasts forever – unless you’re big on beans.  Getting back to it.  Add two cloves of diced garlic. Cook on low heat for 2-3 hours, adding 1 teaspoon of salt at the END.  Add it too soon and the skins will be tough.  Strain the excess liquid along with the kombu (It will be slimy and likely in a few pieces) and keep warm.

For the green chile:  Brown the cubed pork in a little oil on medium high heat, working in batches to keep from overcrowding the pan.  Place in crock or instant pot on low heat.  In the rendered fat of the pork, saute onion until soft.  Add to the crock pot. Add the canned green chiles to the pan, filling the empty can(s) with water to get all of the chile goodness and adding to the pan to deglaze.  Add this mixture to the crock or instant pot.

Chile Peppers: Chop the dried peppers into small bits with a very sharp knife, discarding the stem.  OR, even better, whirl the peppers, seeds and stems removed, in a food processor until they are thoroughly pulverized and kind of powdery. Add to crock pot.  If using fresh poblanos, I turn on a burner and hold the pepper over it until the skin gets blackened, rotating it to get it even.  Your kitchen will smell like chile heaven.  Once all sides are good and dark, place in a paper bag until cool.  Remove the skin by rubbing it with your fingers (don’t touch your eyes, ouch!).  Dice the peppers, discarding the stem, keeping the seeds if you like it a little more spicy.  Add to pot.  Add cumin, chile powder, garlic, and 1 teaspoon salt.  Add 1 cup water.  Cook for 2-3 hours, until the meat is tender and thoroughly flavored. If using an instant pot, pressure cook for seven minutes on normal-low and switch over to slow cook on normal until you are ready to eat.

Putting it all together:  Take a tortilla and set it on a burner turned on medium heat, rotating quickly to keep from sticking or burning.  Once it has softened a little, turn over and do it all again.  Add beans, a layer of pork, and a handful of grated cheese.  Roll up, um, like a burrito, tee hee.  Add another handful of cheese, and top off with another ladle of green chile goodness.  Add your favorite condiments and enjoy!

Added info – I don’t know how much this makes – I’d say at least ten burritos, but I don’t know if you are a Gregory burrito – MONDO or a Colleen burrito – just right.  Let’s put it this way – the recipe fills half of my crock pot, which  holds 6 1/2 quarts.  Also, if you want your chile thick, like a stew, turn the pot to high about a half an hour before you want to eat.  Once it is bubbling mad, take a ladle full of the chile and add 1/4 to 1/2 cup of flour, stirring thoroughly to avoid lumps.  Put back in crock pot and quickly incorporate it.  Keep the the lid off.  It should thicken in a few minutes. I really don’t do this anymore, but some people prefer this texture.

« Older entries § Newer entries »